Tuesday, January 25, 2011

Santa Ornaments - Part 2

Quick overview of how I made these Santa Ornaments for my family this past Christmas.


1. We constructed the ornament's substructure with these items. The three items on the right, plus a short piece of dowel, are the beginning of the substructure; which is assembled on the left. A good base will give your ornament strength. I want these to last a long time, so this was important.
  
All supplies for this project were purchased at Michaels
  • I first cut a circle, the size of a quarter, in the bottom of the cardboard dish; discarding the lid. 
  • Drilled a hole, the size of the dowel, in the smaller thicker disk.  
  • Flipped the dish upside down, applied glue to one side of the larger disk and pushed it all the way up inside of the dish until it was firmly pressed against cardboard; it will fit snugly.
  • Applied glue to one side of the smaller disk.  Centered the disk on top (formerly the bottom) of the cardboard dish and glued down; making sure there was enough glue in the quarter sized hole to help bond the two wooden disk together. 
  •  Placed glue around the tip of dowel and pushed through hole in small disk, until it rests against larger disk.  Let all dry thoroughly.  
  • Sealed the cardboard box with Gesso, since it will be covered with damp paper clay.
  • After I took this picture, I did end up trimming the bottom of this dish a little, since it was too long for the bottom of his coat. I then applied Gesso to seal the cut end.
  • Screwed eye hooks into the bottom of dish, to use for hanging legs in future.
2. Added Styrofoam balls to make the body and head.  
  • I cut the bottom off of the larger Styrofoam ball and trimmed the sides, to make the body bell shaped. 
  • Glued bottom ball onto cardboard dish and used sections of toothpicks/thin wooden skewers to secure the head, so it wouldn't spin, on to the larger ball.
3. Used short lengths of thick (12 gauge) floral aluminum wire (very easy to bend) and tin foil to form hat's substructure (sorry don't have a picture of that). The tip and ball of the hat is the most vulnerable to breakage, so a good substructure is important. Please bear with me, this explanation may be confusing.
  • I pushed one end of a wire into the head and bent to form the angle of hat.  
  • I added two more wires to different areas of the head (3 total) and mimicked hat angle. I added a small piece of twisted up tin foil (in the shape of the hat) inside of the wires to add additional support.
  • Once the tin foil and wires were in place, I twisted and mashed the ends together tightly to form the tip of hat.  The wires will kind of resembled a bent cone or tepee.
  • I left one wire tip a little longer and curled it tightly to form a tiny ball at end of Santa's hat. 
  • I then covered the hat portion, not including ball at end, with a layer of foil. 
  • Used additional small pieces of wooden skewers, that I pushed through hat into head to help secure it and keep it from spinning.  
4. Once we determined the height of ornament, the top of dowel was trimmed.  We then drilled a starter hole in top of dowel, added a dab of glue to end of eye hook and screwed in to hole.
5. Formed Santa's main body using "Creative Paperclay", covering the top of the dowel; only leaving the eye hook visible. **See below for tip.
 Update - People have asked how I made his textured beard, mustache & eyebrows.  I added the shape of these things on his face, then lightly scratched the clay with a pin to create the hair texture. Really easy to do.
  
Leg on left in process.  Right leg completed and waiting for clay.

6. Used same 12 gauge aluminum floral wire and tin foil to make the substructure of legs. Then formed legs and boots with paper clay.  Let dry completely.
7. Sanded ornament thoroughly with fine grit sand paper.
8. Sealed ornament with Gesso and let dry.  This is needed, since the paper clay is very porous.
9. Painted ornament and let dry thoroughly.
10. I signed and wrote the year on the inside (were legs hang from) of each ornament.  
11. Applied 3 light coats of satin acrylic protective spray finish; letting dry completely between coats.
12. Attached ribbon to the top eye hook for hanging.

** TIP - For the last three Santa ornaments, I finished the top of the Santa ornaments completely (formed body with clay, let dry, sanded, painted and signed) and then covered the whole ornament with plastic wrap; poking the leg eye hooks through the plastic. I then started the legs.  Once the legs were finished (substructure built, legs formed with clay, legs dried, sanded, painted and thoroughly dried), I ripped the plastic off and sealed the ornament with acrylic spray.  I learned from the first three ornaments that those darn dangling legs were impossible to work around.  They REALLY got in the way while painting, scuffing and transferring paint from the legs to the main body and back.  This added TONS of touch up time to each ornament and made me pull out at least a few fistfuls of hair from the utter frustration.

I originally wanted to antique these ornaments, to bring out the facial features and the creases in his hat and coat.  I unfortunately ran out of time though; barely finishing them up on Christmas morning.  I really wish I would have had time to antiques them, since I think it would have given them more depth and character.

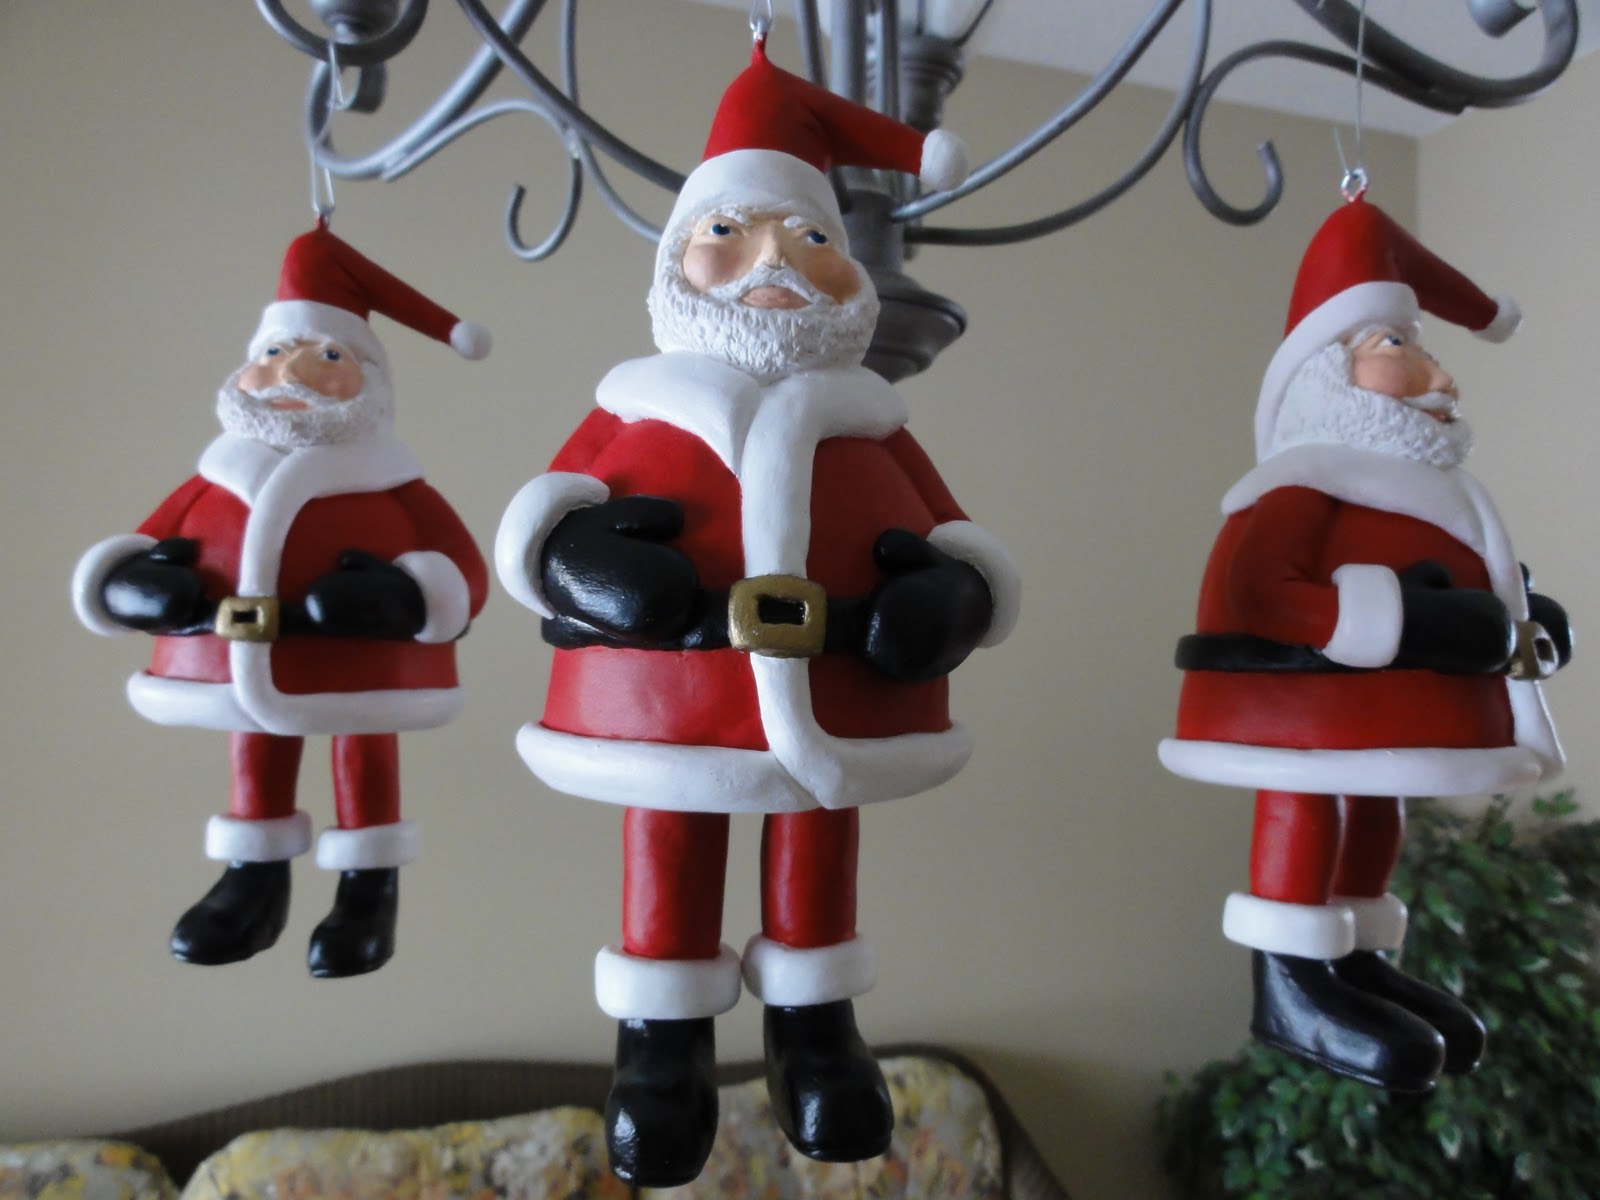
Here are pictures of the last 3 Santa's I made, before I added the top ribbon.
My favorite Santa


 Santa #2

Santa #3 (a.k.a. - "The Big Faced Santa") on left

I made 6 of these ornaments.  You can see the first three Santa ornaments, with hanging ribbon, in this post.  Sorry to say there is only 3 or 4 pictures in this post, but you can see how my technique improved as I made each one.  By the time I made the last one, "my favorite Santa" (shown above), I really had the process and Santa's look down pat.  It really was a learning process.

Blessings, Tracy

Those Angels are Singing Again?

After digging through several of my OH SO messy drawers...just looking for 1 (frickin') item, I decided that I could not take it another day!  Last Friday, I drove directly to The Container Store and purchased a boat load of "Interdesign" clear drawer organizing bins. I decided on this brand, since they had both a 2 and 3 inch deep version of these bins. From past experience, I was tired of shallow drawer organizing bins that hold maybe one brush or tube of toothpaste and leave a lot of wasted space remaining up to the top of each drawer. Since we could fit the deeper bins in our drawers, I bought these in several different sizes and shapes.
Over the weekend, I tried different bin combinations to find the best way to utilize each drawer and the items that I kept in them.  I organized the top drawers in 3 bathrooms (5 drawers total) and our huge junk drawer in the kitchen.
Now that it is completed, I find myself wandering around the house randomly opening drawers...just to feel the rush of happiness when I see how tidy they look.  My husband even noticed and gave me a compliment on how nicely organized everything is.
As you might see in the pictures below, I got so excited I forgot to remove the tags/packaging from a few of the bins.  I will have to go back and do that.  I also have to return the bins that I didn't end up using.

I AM IN LOVE!!!

Here are picture of just of few of my bathroom drawers.


Whoo Hoo!!! My drawers look amazing!

If you decide to do this, search the web for coupons before heading out.  I found a 10% off coupon, just for signing up to The Container Store's website.  I use a secondary email address for things like this.  This way my main email mailbox doesn't get clogged up with sale ads and advertisements.

Blessings, Tracy

Monday, January 24, 2011

See...I told you!!!

I knew it!  I have been telling my husband for years these little devils were dangerous! ;-) EEK! They terrify me.

Blessings, Tracy

Tuesday, January 11, 2011

Daily Reminder!

I recently purchased this charming print by Katie Daisy.  It is bright and colorful and makes me happy when I look at it. We framed and hung it by the door we walk out each day.  It's always nice to have this daily reminder to keep you in check, as you make your way out in the world.

This print hangs in a dark hallway, so these photos really don't do the artwork or beautifully ornate frame justice.


Blessings, Tracy

Friday, January 7, 2011

It's fun to be 1!!!

Our boy Henry (a.k.a. - The Big Galoot) turns 1 today.  Henry weighs 14 pounds now, but feels and looks much heavier.  He is always looking to play and his favorite thing is to chase his poor sisters; especially Lily.  Our boy also gives the word "naughty" a whole new meaning.
From this, about 9 weeks old...crying for food.
 To this, a month ago, "trying" to fit on my laptop briefcase to sleep.

We adore our boy.

Blessings, Tracy

Saturday, December 25, 2010

Santa Ornaments with Dangling Legs...Finished!

Here are a few of my finished Santa ornaments; waiting to go live their new lives with my family members. Each one is a little different from the next; some fatter, some have bigger beards, hands in different positions, etc.  I was in such a hurry on Christmas morning, I didn't get a chance to take many pictures of them.   I thought they turned out pretty cute and my family loved them.  I'll try to post more on them later.

**You can see Santa's humble beings here or brief instructions for these ornaments here.
Blessings, Tracy


Sunday, December 19, 2010

Is that you Mr. French???

Last year, I decided that I should try to make Christmas ornaments each year for my family members.  I was inspired by the snowman ornaments that I saw on "Michelle my Belle's" blog.  This woman is SO creative!  I just love her blog.  Since it was my first attempt at making ornaments, I decided to follow the instructions she posted for her snowman ornaments.  I thought they turned out really adorable and my family loved them.  This year, I came up with an idea to make Santa ornaments with dangling legs .  I am way behind with making these, since I just finished forming the main body of...OMG (sweating and wringing my hands)....the FIRST ornament last night.  Oh yes, did I forget to mention....I have to make 6 of these guys!!!  I seriously think my brain has been in denial that Christmas is only a week away!  While making my first Santa last night, I thought he looked familiar, but couldn't put my finger on who I thought he looked like.  The first thing this morning, I looked and him and thought, "Oh my gosh...Mr. French!"  Not sure any of you are old enough to remember the television show Family Affairs; which aired possibly in the late 60's, early 70's? One of the characters was a very proper gentlemen's butler named Mr. French; played by the actor Sebastian Cabot.  I faintly remember the show, since I was pretty young at the time, but I do remember the characters.  Don't you agree that my Santa looks like Mr. French?
Left to right - Mr. French, Uncle Bill, Jody, Sissy, and Buffy. Not pictured, but also a popular character on the show, is Mrs. Beasley, Buffy's doll.

 
Here are the snowman ornaments I made last year. I will try to post more on them later. 
**You can see the completed Santa Ornaments here.


Blessings, Tracy

Wednesday, December 15, 2010

OH, OUR ACHING BACKS!!!

We had to go remove some 4+ foot snow drifts from my mom's roof yesterday.  She was in the 20 inch range from the snow storm last weekend.  After blowing and drifting, her house and roof were buried. The bad thing about removing snow from a roof, is that when it falls to the ground, it packs really hard.  This make shoveling miserable.  First, you almost have a heart attack struggling to get the snow off the roof, then shoveling the (packed) snow from the driveway and sidewalk almost killed us.  It doesn't look it, but the snow bank on the right side of the sidewalk is just shy of 5 feet high, at the tallest point.  I'm 5'8", so it was up to my shoulders.


I ache so badly this morning, that it almost hurts to take a deep breath. GOD FORBID I have to cough...ouch.

Blessings, Tracy

Saturday, December 11, 2010

Thankful

Our brother-in-law returned from his second tour in Afghanistan on Wednesday.  Since his return, he has been at a base in Florida and was supposed to arrive home today.  BUT, as luck would have it, we are having a good old fashioned blizzard today (ahem, 2 feet of the dreaded white stuff), so the poor guy is stuck in an airport in Florida.  Even though he is safe, I know we will all feel better when he steps off his plane in Minnesota and is truly home.
He has been gone for so long and we have all been very worried about him.  For me, this type of anxiety/worry almost feels, at times, like it takes my breath away. I know it is odd (and proves I need some type of therapy), but I have been almost afraid to say his name out loud while he was gone; worried it would jinx him in some strange way.  If I utter his name or my worries out loud, it makes them real.  Strange and dysfunctional....yep, but that's how I dealt with the craziness that swirls around in my head each day.  I am now also feeling guilty for being relieved that he is home, when so many soldier remain in harms way.  I know....I am a lost cause. I may as well just start blocking out weeks at a time for therapy.
After he returns home, he will have some time off then return to his other "not so safe" career doing police work.

Blessings, Tracy

Amazing Stained Glass Window!

Last weekend, I saw a story on CBS Sunday Morning, showcasing the completely refurbished Eldridge Street Synagogue and Museum.  This synagogue was originally built in 1887 and is located in lower Manhattan; in the heart of New York's Chinatown. Due to a shrinking congregation, who were unable to maintain it, the worship area was closed in the 1950s and soon fell into disrepair.  It has taken 20 years to refurbish the synagogue to how it looks today.  As part of the renovations, they had a magnificent stained glass window designed by avant-garde artisit Kiki Smith and architect Deborah Gans. The story on CBS Sunday Morning, highlights the design, construction and installation of this stained glass window and how the design is carried out on to the surrounding wall.  The pictures below don't really capture the true beauty of this piece, so if you have a few minutes, I highly suggest you watch this short video on the process.  

The Synagogue is a National Historic Landmark and after watching this story, I understand why.  
So beautiful!  If I ever get to visit New York, this will be a "must see" for me.  
Photos via The L Magazine & CBS News 

Blessings, Tracy

Friday, December 10, 2010

Let it snow. Let it snow. Let it snow!

I used the Picnik website to edit this photo of my mom's house.  I like the Picnik site for the days I'm not into dealing with the complexities of my  photo editing programs. The site is so quick and easy to use! 

To edit this photo, I converted it to black and white, then popped just the colors of the house and, last but not least, added the effect of falling snow. I think it looks so pretty. 

Blessings, Tracy

Wednesday, December 8, 2010

A Stroll Down Memory Lane...Funny Commercials.

I haven't seen this commercial for a few years, but it still kills me.
Nissan "Doggie Mind Control" commercial (Dogs Driving SUV) w/ Clint Culp...

Blessings, Tracy

Thursday, November 25, 2010

Happy Thanksgiving

Henry is so thankful that he picked us to go home with from the Humane Society last spring....AND (apparently) for his beautiful teeth. He is such a goof.  Our boy has a can do attitude & thinks every encounter is an opportunity to play; as demonstrated in the picture below.  
"One minute I'm sleeping, the next she's approaching me with a camera, so I give her this look.  OK, she's smiling...now maybe I can get her to come a little closer, so I can bite her."

Saturday, November 13, 2010

Damn You Old Man Winter!!!

The old SOB arrived at our house in the middle of the night, so we woke up to THIS!
This isn't bad, but it is still snowing heavily at this point and it is going to continue until tomorrow morning!

Excuse me, while I weep gently for a moment...

We are on track to get 7 to 12 inches; most likely in the 10 inch range. It is really heavy wet snow, so the poor trees are just hanging from the weight of the snow. I love the 4 seasons and all, but I like to ease into winter gently, not be thrown in full force!
Our poor birch tree is leaning from the weight of the snow.

It is really BEAUTIFUL...
...if you don't have to DRIVE in it!

OH YES!  I am one of the lucky few that has to work this weekend.  The drive alone will make for an exciting day.  Fingers crossed!  Wish me luck!


Blessings, Tracy

Friday, November 12, 2010

Do You Hear The Angels Singing?

I have to admit that we occasionally waste money on things that are not that important, but when it comes to the items that makes every day life easier...we are tight fisted with the cash.  Not sure what that says about us, but I know it probably means we have some deep seated issues that I'm not sure I want to know about.  We generally keep things FOREVER!!  We have a hard time replacing something if the one we have works perfectly fine or at least is serving the purpose. So, making a new purchase is a big fat hair deal for us!   
We finally got tired of playing the mismatched food storage container game.  This game has two parts.  The first part of this challenge is to try to get ONE food storage container out of the cupboard without every single piece popping out.  Note - you can earn extra points for actually retrieving the exact size you need.  The second part, is to try and find a matching lid to this container.  OK, you have five minutes to complete this task...GO!  
After years of discussing us getting some new food storage containers, we finally took the plunge (a.k.a. - I had an unstable moment in Target).  I purchased the new Rubbermaid "Easy Find Lids" food storage system.  The beauty of this set, is the lids snap on to the bottom of the container and each other, so they STACK and NEST neatly.  I checked out the box sets and settled on the 20 piece set (10 containers with matching tops), which came with a bonus 11th "Produce Saver" container and lid.  Be careful when purchasing box sets.  Take note what size containers and how many of each size are included in the different sets.  I found the larger set (at Target) just gave you additional ultra tiny containers that most people rarely use.  To supplement the set I purchased, I bought a mix of 4 commonly used larger sized container (7, 9 & 14 cup).  The total was about $30 for 15 pieces.  You can find these cheaper if you shop around...which I did not, since I lost my ever living mind in isle 32 at Target.  
I can't believe how nice our cabinet looks.  It created room for us to move some items around, thus freeing up storage space in other cabinets.


Before
Believe me, the items on the bottom two shelves are CRAMMED in there tightly. One wrong move and they will all spring out of like one of those joke cans filled with snakes. You know, the ones that scare the hell out of you when you take the lid off and they all pop out! Does anyone else remember this practical joke back from days of yore?

After

Yep, I hear those angels singing too.

Blessings, Tracy


Monday, November 8, 2010

OMG!! When I say him...I nearly had an "Art Attack"!

I attended the "Art Attack" open studio event at the Northrup King Building yesterday.  The Northrup King Building is home to over 200 tenants including a creative center to over 190 artist as well as various small business and nonprofit organizations.  I go there several times a year for their open studios events.  I always walk out feeling inspired by all of the beautiful art.  I also love seeing the artist's work spaces, including the tools they use and seeing the works they have in progress.  Most of the artist are very nice and willing to discuss their work, their educational backgrounds and the processes they use to create their pieces.  Some occasionally have demos during these open studio events and a few regularly teach classes at their studio.  There are many wonderful artist in this building, but two studios that I always make a point of seeing are SoMi Tileworks and Sharra Frank Fine Art Mosaics.  Kirsten Walstead is the artist behind SoMi Tileworks.  She makes these beautiful, chunky tiles and tile collages, that I am in so love with.  I do think her website could use some updating to show a better representation of her beautiful collages, including many of her newer pieces.  I also think it is hard to grasp from the pictures how beautiful these pieces are in person.  Sharra Frank's studio is like a magical wonderland for me.  I swear I feel energized by her creativity.  It's like a drug for me.  She makes spectacular mosaic pieces and her studio is filled to the brim with beads, gems and interesting objects she uses in her art.  Unlike my work space, her supplies are all artfully arranged like a Macy's Christmas display.

While nearing the end of my tour, I noticed a tall gentleman walking in front of me.  He was wearing black jeans, red converse style high top tennis shoes, a black leather coat and he had a great looking dark faux hawk (not everyone can pull off this look well).  As he turned his head to talk to one of his friends, I saw the side of his face and my heart nearly stopped!  I remained calm, but in my head I was screaming, "OMG...is that Christopher Straub from Project Runway?!"  I am a huge Project Runway fan, so this was a surreal moment for me.  I am also one of those (stupid) people who always thinks I should leave celebrities alone while they are enjoying their leisure time, so I didn't say anything to him.  HELLO...CHRISTOPHER STRAUB....I'm not sure what the hell I was thinking when I made that crazy decision.  Yes, in the end, I left the poor man alone.  But 
on the inside, I was seriously jumping up and down, clapping my hands and screaming, "I love you Christopher Straub!! I love you!!"  We were in the last few studios together and while he was enjoying the art, I was struggling to keep myself from staring at him.  I got all excited a second time when a crazy thought crossed my mind that Christopher knows Tim Gunn, one of the regulars/host on Project Runway, whom I also ADORE (cue the internal screaming and jumping up and down).  I hope he didn't notice the goofy looks I was giving him.  I was pitiful! 

Here are a few pictures of Christopher recreating some of the looks I may have given him while we were enjoying the studio tours. OK, I may have been stalking him. 


Well, I enjoyed a beautiful fall day, looked at some wonderful art and was lucky enough to run into...OMG, Christopher Straub!!  Most importantly, I escaped the day without any restraining orders.


Blessings, Tracy


Friday, November 5, 2010

Now that's cute!

I saw this "Perfect Roast Turkey Timer" at Patina the other day.  I thought it was funny that the legs pop up when your turkey is done. It made me chuckle.


Blessings, Tracy

Monday, November 1, 2010

Oh, Dexter!!!


Masuka had the best scene on Dexter last night.  Love his crazy "Two Words" theory, as to what (he thinks) happened at this crime scene.  The gestures of Masuka and facial expressions of Debra & Dexter are priceless.  Maybe it's one of those times that you have to understand or watch the show to get the full humor it??  I don't know, I just thought it was really funny. You can see the clip from last night's Dexter here.  I love this show!
**Warning - Clip NOT appropriate for children!**

Blessings, Tracy

Halloween


Blessings, Tracy