Wednesday, October 20, 2010

Creepy Dripping Candle

Here is one of my newest projects.  I found this idea in the book, "How To Haunt Your House".  Here is how I did it.
  1. Buy a PVC connector from your local hardware store.  Mine is about 3 1/2 inches wide and cost less than $2.  
  2. Buy a piece of thick styrofoam.  I had a scrap 1 1/2 inch thick piece left over from another project.
  3. Buy a white battery operated tea light.  I could only find orange, so I had to paint it white.
  4. Grab your glue gun and a boat load of glue sticks. I used 9(?) full size (10 inch) glue stick.
  5. Press PVC connector into styrofoam to leave an impression. Cut out circle with a serrated knife.
  6. Put tea light in the center of circle and trace around it.  Using an X-acto knife, cut a hole without going all the way through, so the tea light can sit inside.
  7. Push styrofoam into PVC connector, pushing it down about 1/2 inch below the rim of the PVC.
  8. Place a piece of wax paper under your PVC.  Start applying hot glue to the top and sides of candle; trying to make it look like a real dripping candle. I also added glue to the top of the styrofoam just up to the edge of the candle hole and I let glue pool (on the wax paper) at the base of the candle.  *You can put a square or round object under your wax paper to mimic the edge of a mantle, etc. and let the glue make long drips down the side of the object.  Once it has cooled, you can place it on the edge of your mantle and it will look like it is dripping over the edge.
  9. Build up the top melted edge.  Let the glue cool between layers to help build up edge.  The book suggests, "One way to help build height is to hold the freshly glued PVC upside down over a bowl of ice. Keep PVC moving so the glue does not run off the PVC."  I did this, but had to pick up the whole piece of wax paper, since it was stuck to it.
  10. The book SAYS that hot glue does not stick to wax paper, but mine did.  It was easy enough to remove, but since the wax paper is pretty clear, you can't see the little pieces that I couldn't get off.
  11. Once it is cooled, place the tea candle into the styrofoam.  Turn down the lights and turn it on.  It really does look like a candle, with the top (built up edge) glowing with the flickering of the candle.
PVC connector


 Blessings, Tracy


Monday, October 18, 2010

Need I say more....


...and we use it 
about 100 times a day on HIM!! ;-)  

Blessings, Tracy

Saturday, October 16, 2010

Great, Great Grandpa Mr. Bones

I ran across this antique image on the internet and just knew it would be fitting for our Halloween decor.  I printed it, backed it with black paper and framed it to place next to the front door.  We tell the neighborhood kids a whole tall tale about how this was Mr. Bones' Great, Great Grandfather and tell them about all the great (ahem...outlandish) things  he did during his life (i.e. helped build the Brooklyn Bridge, fought it two wars, invented the ice cream cone...the list goes on and on).  I know silly, but everyone gets a kick out of it...especially me and my sweet hubby.  My husband even has a funny/strange first name for him, that escapes me at the moment.  It really makes the little ones stop and think for a minute or two. It also adds to the "mystic" of the bony fella who likes to ride through our front garden each fall.  
Blessings, Tracy

Thursday, October 14, 2010

Creepy Hanging Spiders & Fading Ghosts....OH, MY!

Here is a quick video showing the Creepy Hanging Spiders that we hang on our front porch each Halloween.  I have not put out the rest of the porch decor yet, but this will give you an idea of how these guys look while they are swaying in the wind.  I have also added a close up our Fading Ghost Silhouettes at the end of the video.  
Excuse the video quality, this is subject I know (less than) nothing about putting together. 
P.S. - The first section is pretty narrow, but give it a second, it will expand with the next shot.


**Update - Ok, Ok!  From what I am hearing, some people can see the video, but most say they can not.  Not sure what the hang up is, maybe it's a Mac vs. PC issue.  If you can't see the above video, try this link.  There is no music in the youtube version, but you will be able to see the video.

The music in the video is called "Dr. Sayer".  It is from the Awakenings soundtrack, which was written by the Randy Newman.  Yes, the same Randy Newman that wrote the song "Short People".  Come on now...he really is a very talent composer.  Although I have many "favorite" movie soundtracks, this really is in the top ten for me.  The music is beautiful and has haunted me since I first saw the movie.  I have many favorites on this soundtrack, but another track that I am quite fond of is a piano piece called "Dexter's Tune".  Last time I checked, it is nearly impossible to find the CD, but I think it is available on ITunes.  

Blessings, Tracy

Monday, October 11, 2010

A Fascinating Place to Visit!

I recently visited the Accent Store Fixtures warehouse in Minneapolis.  This business sells new and used store fixtures and I have to say, it is a fascinating place.  I am a big antique/salvage yard or warehouse type of person, so this was right up my alley.  It's like a huge store fixture graveyard.  

For anyone looking for mannequins or mannequin parts to use in your Halloween decor, you need to find a place like this in your area.  I thought "most" items were fairly priced.  Although, I do think you need to visit the warehouse to find the best deals.  I found the prices to be generally cheaper than listed on their website, especially on slightly "dinged up" mannequin.  Most of the dings in these mannequins you wouldn't even notice unless they were left standing naked in your front yard.   Here are pictures of just a small sampling of  items this business carries.
Here you can see the styrofoam male mannequin heads I used to make my Mummy Heads. They were $5 each. You can see my Mummy Heads here and here.

Love the Superman pose the guy on the left is pulling off.

Interesting???


LOVED these life sized styrofoam torsos. I thought they were a good deal at $15 each!  These would work great (lightweight option) for anyone interested in making a "Witch's Urn" like mine.  I did see regular mannequin torsos similar to the ones I used for $30.


They have great wall organizational basket systems.


Display cases and racks up the wazoo!


Colorful rolls of ticket stock.


Blessings, Tracy

Tuesday, October 5, 2010

Mummy Head #1...done?!

Here is the first guy finished. I think?! OK, I'll admit it...I am a constant "tweaker". It truly is a curse, but I tend to play with things FOREVER. I constantly have to say to myself, "Walk away Tracy, just walk away."
Now moving on to my second "two eyed" mummy head and continuing to work on a million other projects.


Blessings, Tracy

Friday, October 1, 2010

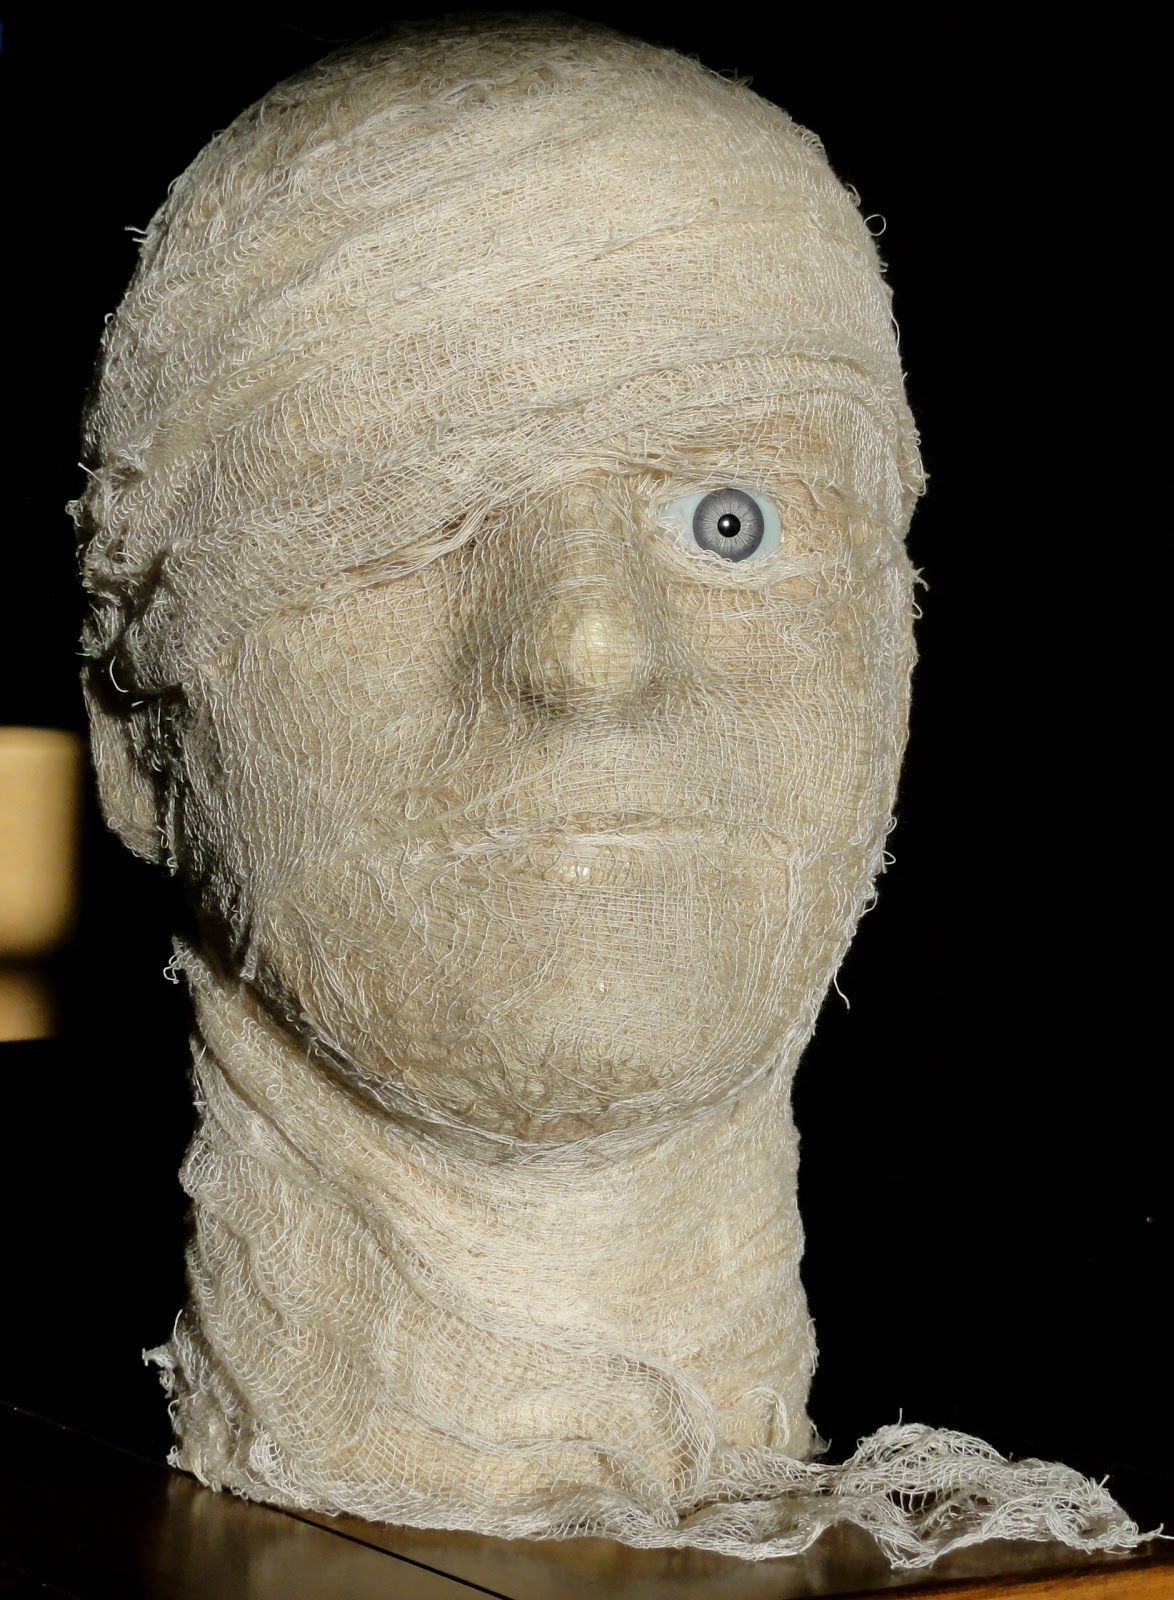
Mummy Head...in progress!

       Mannequin head with a 26mm doll eye.


To make this guy -
  1. I purchased Styrofoam head and carved out a hole where his eye was.  I then pushed a 26mm doll eye in the hole snuggly.
  2. I tea stained strips of cheese cloth and let them dry.  
  3. I distressed cheese cloth strips as I layered them on.  Every few layers, I painted on/dripped/misted face with watered down craft paints, to accent areas like eye, mouth, etc.
Waiting for him to dry (after some aging), so I can add additional gauze.  He is not turning out exactly how I hoped, so let's see if I can pull a rabbit out of my hat make him look a little better. Worried!

***Update - See our finished Mummy Head HERE!***

Blessings, Tracy

Thursday, September 23, 2010

5:20am....Mom WTF?!

Here is Stella giving me the, "Mom, what are we doing up this early" look.  She cracks me up!


Blessings, Tracy

Monday, September 20, 2010

Anticipation!!!

Oh, how I love me some Dexter!  It's taken me all summer to recover from the season finale, which I'm still not sure I am completely over.  Now...I can't wait for the new season, which is starting next week!  Gasp!

Blessings, Tracy

Monday, September 13, 2010

Starting a new Halloween project!

1. Buy Styrofoam skull - CHECK!

2. Prime skull - CHECK!


I'm keeping the technique I plan to use under wraps, for now, but it's a little intimidating for me.  Not sure why, because I have used this technique on a million other projects, but (for some unknown reason) this one kind of scares me.  Trying to work up some courage to start.
Blessings, Tracy

Tuesday, September 7, 2010

Yes, we are entering...Chicken Nacho NIRVANA!!!


nirvana |nÉ™rˈvänÉ™; nir-|
 Dictionary
   • a state of perfect happiness; an ideal or idyllic place.
  Thesaurus
   • PARADISE, heaven; bliss, ecstasy, joy, peace,serenity,      tranquility; enlightenment.


12 x 17 inches of Chicken Nacho goodness!


This is a recipe that I came up with several years ago and it has become one of our favorite "weekend sins". The recipe has evolved over the years, but here is the version we are currently using. Some may feel these are a little spicy or they may like more or less cheese on their Nachos, but it is an easy recipe to adapt to your taste level. When we make these, we split the chicken mixture and remaining cheese in half and make Nachos twice over a week OR...shhhh, don't tell...sometimes two nights in a row.

Awesome Chicken Nachos
  • 2 tsp. - Chili Powder 
  • 2 tsp. - Ground Cumin 
  • 1 ½ tsp. - Oregano Leaves 
  • 1 tsp. - Crushed Red Pepper 
  • 1 tsp. - Garlic Powder 
  • 1 pk. - Boneless Chicken Breast (20 oz. package) 
  • 1 - 14 ½ oz can undrained “Red Gold (brand) Diced Tomatoes, Chili Ready" **see note 
  • 1 - 15 oz. can undrained "Kuner's Black Beans, with Cumin & Chili Spices" (usually located in Mexican food isle) **see note 
  • 6-8 c. - mix of shredded Monterey Jack & Mexican Cheeses - divided (we eyeball the amount of cheese we use, so don't know the exact amount) 
  • 1 - “Super Size” bag of “Tostitos” Corn Chips (large chips) 
  • Sliced fresh or jarred Jalapenos 
  • Garnish – sliced Green Onions, chopped fresh Tomatoes, shredded Lettuce, med/hot Red Taco Sauce or Salsa & Sour Cream (or lean), Guacamole, etc.

Cut chicken into small chunks/pieces. Mix seasonings; sprinkle over chicken. Heat oil in skillet over medium high heat; add chicken. Saute chicken 5-8 minutes, until done. Add undrained tomatoes and black beans, cook until well heated; about 5 minutes. Add 1 to 1 1/2 cups of cheese & cook until mixture thickens; remove from heat (sauce will continue to thicken some while sitting). 
Heat oven to 450 degrees on the broiler setting. Cover large jelly roll pan or baking sheet with heavy duty tin foil; lay out one tight layer of chips. Add desired amount of sliced Jalapeno (*optional - you can add chopped white/yellow onion to chips), then drop pieces of chicken mixture onto chips (there will be extra). Sprinkle with desired amount of cheeses. If you would like, add additional 1/4 to 1/2 layer of chips, jalapenos, chicken mixture & cheese (we do this). Cook Nachos until cheese is melted, watching closely (in the first picture, notice the tips of a few of my chips were starting to burn). Add garnishes.
While eating, if we still feel we need more chips to balance it out, we will use additional chips from the bag. 
Depending on the amount of Nachos you make or the amount of chicken you add to your Nachos, you will most likely have enough chicken mix left over for a second batch. Everyone has different tastes preferences, so you may need to make these a few times, before you find your perfect balance of spices, chicken mixture & cheese. 

**Note - If you want to reduce spice level, you can either drain the liquid from the Kuner's Cumin & Chili spiced Black Beans or use regular Kuner's Black Beans; rinse before you add to pan. You can also drain some of the liquid from the Chili Ready Tomatoes or use regular Red Gold diced Tomatoes. I suggest keeping the Chili Ready version & instead reducing some of the spices a bit. 

My husband isn't a big lettuce or fresh tomato person, so you will notice our Nachos have no lettuce & only light tomatoes on one side.  We also forgot to put the sour cream and Guacamole on our Nachos before we took these pictures. Oops!

Happy Anniversary....Sweetie?!

Our Anniversary started off this morning, with me dropping my darling husband off at the airport at 5 (frickin') AM.  I gave him a quick kiss goodbye, then he promptly flew off to Atlanta on a business trip.  
THE END!

Love you!

Thursday, September 2, 2010

Squeal!!!

Just received this new book, "How to Haunt Your House"!  It looks awesome!  Hoping to find some renewed Halloween inspiration!


Anxiously awaiting "How to Haunt Your House, Book 2" to arrive late today or tomorrow.


Blessings, Tracy

Tuesday, August 31, 2010

DOCTOR NEEDED....STAT!!!

One of my skeletons had a little mishap in the basement; which resulted in the poor guy suffering a severely broken leg.  What happened buddy?  Hope you are feeling better before Halloween.


Blessings, Tracy

Friday, August 20, 2010

The Big Galoot!

Henry, at about 2 1/2 months old, lying in my arms while I was on the computer.

At about 4 1/2 months old.

Today - The big galoot attempting to lay in my arms like he did when he was a kitten.  I had to move the computer across the island, just to fit him in the picture.  He finally gave up & went to a more comfortable spot.  
He is 7 1/2 months old & weighs a whopping 12 1/2 pounds.  He's a BIG BOY!


Blessings, Tracy

Wednesday, July 21, 2010

Vacation, continued

The Palace of Fine Arts, in San Francisco.  Beautiful!
Blessings, Tracy

Tuesday, July 20, 2010

Vacation, part 2

And here.....

The beautiful Muir Woods!  It's a must see if you are ever in the San Francisco area.

Blessings, Tracy

Monday, July 19, 2010

Vacation

We are physically back from our vacation...but our minds & hearts are still lingering in places like this.


Blessings, Tracy

Thursday, May 6, 2010

So pretty!


Just returned home from work late this evening, to see this out our front window.  Not the best picture, but it really shows how stunning our Prairie Fire Crap tree is each spring!  We up light our front trees, columns and the architectural peaks of our house with landscape lighting.  This lighting really accents our home and landscaping, but for about a week each spring...all anyone can focus on is the beauty of this crab tree's spring blossoms.

Blessing, Tracy

Tuesday, May 4, 2010

I guess we had a storm last night?

I woke up to find small piles of hail all over our yard.  When I called my husband at work this morning, he informed me that we had a storm while I was working last evening.  Hello...I guess we had a storm!  I couldn't believe all of the hail that was still unmelted 15+ hours later.

We are lucky, since over the past three years (each time in May), we have been hit by damaging hail storms TWICE!  We're talking serious hail...the size of baseballs!  We have had to replace our siding & shakes, our roof (twice), our screens on our screened in porch, window screens, air conditioning repairs, garage doors repairs, chipped cedar columns, damaged plants, etc.  We can pretty much tell you from experience, not much is left undamaged when you have hail that size.
We have also been very fortunate in the weather department.  In the past 8 years, there have been two tornados that hit within 2-3 miles of our house.  Both were serious storms that caused a lot of damage, but the most recent tornado (5 yrs. ago) destroyed many homes and ended up killing one person.  Because of this, I know that we are lucky just to wake up every morning and still have our health and home (hail damaged or not)!

I know you must be thinking, "What kind of Bermuda Triangle of weather did you people move into?!"  I think the same thing every time a storm is in our forecast.
Just so you know....I will be holding my breath and keeping my fingers crossed for the rest of this month!

Blessings, Tracy

Monday, May 3, 2010

How does our garden grow?

Spring is definitely here!  Our plant beds are coming to life and our crab tree is starting to bloom.  Everything looks so fresh, healthy and new!

Blessing, Tracy